The Ultimate Guide to Kokedama: How to Make a Hanging String Garden
I Killed My First Kokedama (And You Probably Will Too)
I’ll be brutally honest—most indoor plant trends right now are absolute garbage. We spent the early 2020s hoarding sensitive, overpriced tropicals in massive, ugly plastic pots that ate up half our apartment floors. It was exhausting. I remember staring at a $200 Monstera rotting in my living room and thinking: there has to be a smarter way to do this.
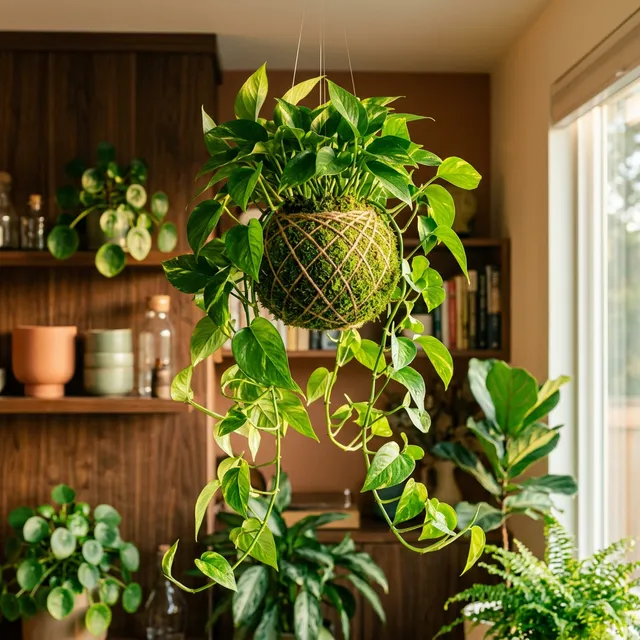
Enter Kokedama. Translating literally to “moss ball,” this centuries-old Japanese botanical art form completely ditches the pot. You take the roots, pack them in a highly engineered mud ball, wrap it in moss, and suspend it from your ceiling with string.
It is the ultimate “pocket” garden. It frees up your floor space, looks insanely cool, and perfectly satisfies that biophilic design trend everyone keeps talking about without feeling like a sterile corporate lobby. But here is the unpopular opinion: most tutorials online on how to make them are setting you up for total failure. They tell you to use standard potting soil. If you do that, your floating masterpiece will either dry into a brick or dissolve into your living room rug.
This DIY kokedama tutorial isn’t generic fluff. We’re going to break down the actual soil science, the specific plants that won’t die on you, and exactly how to maintain these floating, wabi-sabi sculptures without losing your mind. If you want to dig deeper into why the imperfect, messy nature of these balls is actually their strongest aesthetic feature, read our take on The Art of Wabi-Sabi.
Let’s build a hanging string garden that actually survives the winter.
The Fake History of “Zen” Marketing
Let’s get one thing straight about history. Everyone slaps the word “Zen” onto these things to sell them at a massive premium. As someone who has spent years killing, reviving, and aggressively testing indoor garden systems, I’m frankly exhausted by the wellness-washing of basic horticulture. So let’s talk about the real history—no marketing fluff.
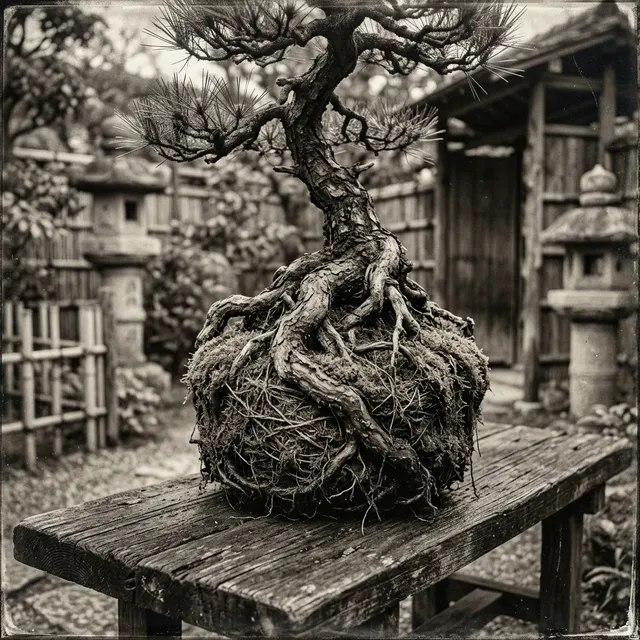
A traditional Edo period Nearai bonsai, showcasing the raw, unpotted root structure that ultimately birthed the entire "moss ball" movement.
Kokedama has real, grimy roots. It evolved from the Nearai bonsai tradition during the Edo period (1603-1867). Back then, strict, formal bonsai growing was a rich man’s game, reserved for the samurai elite and aristocracy who had the money for exquisite, imported Chinese clay pots. But in Nearai, a bonsai tree was allowed to grow until its roots became so tightly packed that you could pull it entirely out of its ceramic pot, and the root-soil mass would hold its shape perfectly.
Eventually, clever horticulturalists—people who probably couldn’t drop a month’s salary on a glazed pot—realized they didn’t need the expensive container in the first place. You could just wrap the exposed, dense root ball in local sphagnum moss to keep it from drying out. Boom. The “poor man’s bonsai” was born. It was an aesthetic of necessity. It embraced the decay, the dirt, and the raw organic material instead of hiding it behind polished ceramic.
Today, in 2026, we aren’t exactly doing this because pots are too expensive. We’re doing it because of space. Urban apartments are tiny. If you live in a 500-square-foot studio, you cannot sacrifice floor space to a massive rubber tree in a twenty-inch planter. We desperately need to integrate biological architecture into our living spaces without sacrificing our square footage or treating our plants like disposable furniture. By adapting our spaces vertically with a hanging string garden, we honor the wabi-sabi aesthetic of finding genuine beauty in natural imperfection, the dignity of age, and extreme structural minimalism.
But the brutal truth is that this aesthetic minimalism only works if you intensely understand the anatomy of what you’re actually building.
The Architecture of a Moss Ball (Stop Guessing)
Before you run to the hardware store and start buying random dirt, you need to understand the structural physics of what we are building. A string garden is not just a clump of potting soil tied together with twine. It’s a bio-engineered capsule composed of four very distinct layers. If you mess up any of these layers, the whole system inherently fails.
Layer 1: The Root Core
At the dead center is your living plant. That root system is the engine. Because this art form restricts root expansion (which is essentially what bonsai techniques are designed to do), the plant stays naturally compact. But if the roots don’t get oxygen, they rot. If they get too much air, they fry.
Layer 2: The Structural Mud Matrix
This is where 90% of beginners screw up. Surrounding the roots is a specialized mud matrix. Forget the fluffy, lightweight potting mix you buy at Home Depot. This layer must be incredibly dense and water-retentive, but it also has to hold its physical shape against gravity when it’s soaking wet. It’s the concrete foundation of your spherical garden.
Layer 3: The Green Skin
A thick layer of sphagnum or green sheet moss goes over the mud. Think of it like a protective ceramic pot. It stops the interior mud from instantly evaporating into the dry, climate-controlled air of your apartment. Plus, it provides that killer, lush visual texture that everyone is obsessed with.
Layer 4: The Tension Wire
The outermost layer is natural jute, heavy waxed cotton, or invisible monofilament. This isn’t decorative—it’s highly mechanical. The string provides the tension required to squeeze the moss tightly against the mud, locking the spherical geometry into a permanent shape that can survive years of watering, drying, and gravitational pull.
The Soil Hack You Actually Need
Let’s call out the biggest lie in the houseplant scene right now: mixing standard potting soil and peat moss until it looks like brownie batter. Absolutely disastrous. Lightweight soils simply lack the heavy density and binding physics required to hold a suspended sphere shape.
Authentic Japanese practitioners use a notoriously precise mix:
- Akadama: A porous volcanic bonsai clay that provides oxygen to the roots.
- Keto: A sticky, incredibly heavy Japanese peat that acts as an intense glue.
But authentic Keto and premium imported Akadama are annoyingly expensive and practically impossible to find outside of specialty bonsai shops. So, after killing dozens of plants in our own urban studio, we engineered the ultimate keto soil recipe substitute. It perfectly mimics the Japanese originals using cheap, locally sourced materials.
The Bulletproof Ratio:
| Ingredient | Ratio | Purpose |
|---|---|---|
| Premium Peat-Based Potting Mix | 2 Parts | Provides absolute baseline moisture and acidity for root health. |
| Finely Cut Long-Fiber Sphagnum Moss | 1 Part | Chopped heavily, it acts as internal rebar for massive tensile strength. |
| Unscented, 100% Pure Clay Cat Litter | 1 Part | Non-clumping bentonite clay binds the peat matrix into an immovable rock when hydrated. |
Pro Tip: This hack saves you fifty bucks and works identically to the Japanese imports. The clay dust is your binder. When you hydrate it, the fine silicate particles physically lock the peat and chopped moss together into a dense, immovable rock. It will not disintegrate when you submerge it in water. Period.

Aggressively kneading the internal matrix—a precise combination of peat moss, chopped sphagnum, and non-clumping bentonite cat litter acting as a highly water-retentive clay binder.
Stop Putting Succulents in Moss
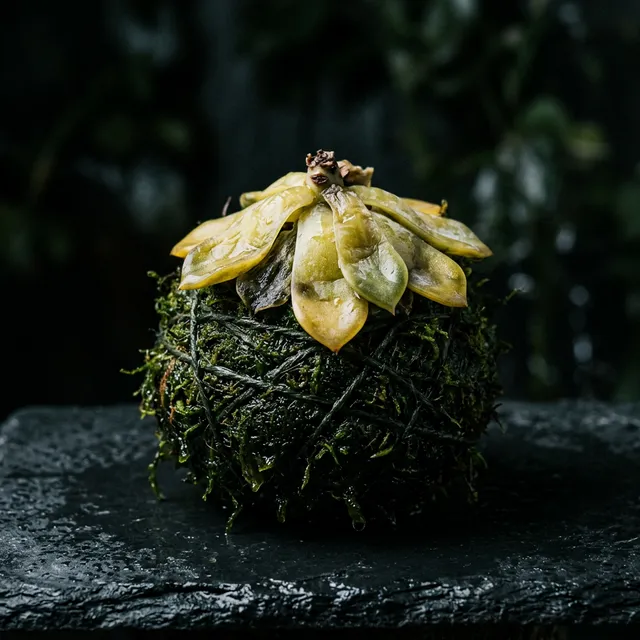
The inevitable result of a Pinterest trend: a succulent failing from severe anaerobic root rot because it was entombed in a constantly damp layer of heavy sphagnum and clay.
Search “best plants for kokedama” on Pinterest or Instagram and you will instantly find hundreds of gorgeous, painfully aesthetic photos of Echeveria, Aloe, and Cacti perfectly wrapped in lush green moss.
Do not do this. Ever.
I’ve seen this countless times: gorgeous table settings overflowing with desert cacti packed into soaking wet moss. It looks incredible on day one. But by day twenty, they dissolve into a nauseating, gelatinous black sludge.
Succulents have root systems built over millions of years to survive the brutal desert. They need massive wet-dry cycles and tons of oxygen. If you entomb them in a perpetually damp ball of peat and clay, they will suffocate. They turn to black mush and die of anaerobic root rot within three to four weeks. It’s a literal botanical death sentence.
You need plants with shallow, fibrous root systems that don’t mind physical confinement and actually prefer having damp feet.
Plant Selection Matrix
Instead of guessing, use this matrix to match the biology of the plant to the lighting of your apartment:
| Plant Category | Top Species | Why it Works in Kokedama |
|---|---|---|
| The Trailing Show-Stoppers | Golden Pothos, English Ivy | Trailing vines act as a massive structural counterbalance. |
| The Humidity Addicts | Boston Fern, Spider Plant, String of Turtles | Evolutionary ancestors lived in damp forest litter, making them bulletproof here. |
| The Dim Light Survivors | ZZ Plant, Bird’s Nest Fern, Parlor Palm | They tolerate dark corners (making the perfect shade loving kokedama) and have shallow root systems perfect for tight moss binding. |
Pro Tip: Surrounding yourself with these complex textured plants—especially Aroids—has been scientifically proven to calm your nervous system down.
The Sourcing Dilemma
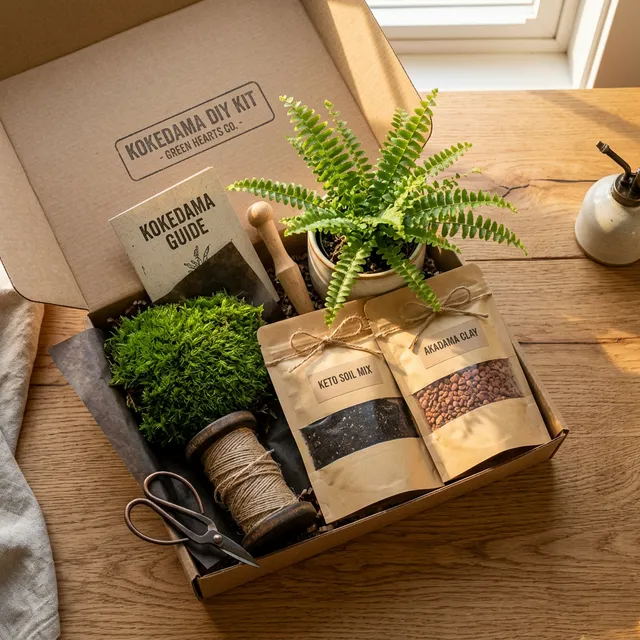
For urban dwellers lacking the storage for 40-pound bags of bulk soil, a premium DIY kokedama kit offers the exact, pre-measured ratios required for success.
Before you get your hands dirty, you have a logistical choice to make. Do you hunt down the raw components in bulk, or do you bite the bullet and buy a DIY kokedama kit?
If you’re planning to mass-produce ten of these for your entire living room or as wedding gifts, definitively buy the raw bulk bags of peat, clay litter, and huge 500-foot spools of twine. It’s significantly cheaper per unit.
But honestly? If you live in a tiny studio apartment, have zero closet space to hide a 40-pound dripping bag of peat moss, or just want a foolproof weekend project that won’t utterly destroy your kitchen counter… buy a premium DIY kokedama kit from a reputable botanical shop (like Bloomist).
These kits cut out the frustrating sourcing phase. They physically hand you a nursery-acclimated plant, the exact pre-measured soil blends (often the real Akadama and Keto straight from Japan), fresh preserved sheet moss, and correctly gauged waxed twine. It’s the path of least resistance. Sometimes, paying for convenience is the smartest thing you can do.
Execution Masterclass: Let’s Get Dirty
This isn’t just a list of steps. This is a highly tactile, incredibly messy craft. You need to know how it feels. Roll up your sleeves and put a tarp down.
Phase 1: Root Prep
Pop your selected plant out of its ugly plastic pot. Don’t violently rip the roots apart—gently massage the loose, commercial soil away with your thumbs. You want to expose the core root mass but leave a little dirt around the main stem to prevent severe transplant shock.
Phase 2: Mixing the Mud (The Toss Test)
In a wide basin, dump in your keto soil recipe substitute components (peat, chopped sphagnum, clay literal). Add water incrementally. Like, a quarter cup at a time. Get your hands in there and aggressively, violently knead it. You are forcing the clay particles to bind.
You want the consistency of dense, sticky brownie batter that’s firmed up in the fridge. Pick up your mud ball. Gently toss it a few inches in the air from hand to hand. Does it crumble and break apart? You need to add more water and clay. Does it drip wildly down your wrists? Add dry peat immediately. It needs to be rock solid.
Phase 3: The “Hamburger Patty”
Take that dense mud sphere and split it directly in half. Just like a hamburger bun. Lay the exposed plant roots right in the center of one half, spreading them out. Slap the other half on top, sandwiching the roots completely. Squeeze the whole thing tight with both hands. Any microscopic air pockets left inside will dry out and murder the hidden roots.
Phase 4: The Binding (Don’t Mess This Up)
Soak your sheet moss in warm water for five minutes. Dry moss snaps like a brittle twig under tension; wet moss forms perfectly to your mud ball geometry.
Wrap the wet moss around the soil until absolutely no dirt is showing. Now comes the hard part. Rest the sphere on the table to stabilize it. With your dominant hand, pull your waxed twine tightly across the moss. You want it tight enough to dig slightly into the green sponge. Wrap horizontally. Then vertically. Then diagonally.
It will feel chaotic at first. You will drop the string. Stick with it. The crisscrossing geometric pattern will soon emerge, locking the organic matter into place like a tight corset. Tie a hard double knot. You’re done.

The mechanical phase: using high-tension waxed twine to tightly compress the wet sheet moss against the heavy mud core, permanently locking the sphere's geometric shape.
Maintenance Uncensored
Almost every lifestyle blog on the internet stops writing the second the string is tied. They treat this living biological entity like a plastic desk toy. That’s exactly why people routinely throw these out three months later.
Watering: The Submersion Protocol
You cannot water a hanging string garden with a normal watering can. The water will just violently roll off the moss curve and ruin your hardwood floor, leaving the interior roots completely bone dry.
If you want to know exactly how to water a moss ball, follow the “Weight Test” and the “Submersion Protocol.” Because those stupidly expensive electronic moisture meters are useless in dense clay.
The Weight Test: Just lift the living ball. When it’s fully hydrated, it feels heavy and dense like a small bowling ball. When it desperately needs water, it feels startlingly hollow and frighteningly light. Check it every four days.
The Submersion Protocol:
- The Soak: Fill a sink or deep basin with room-temperature water. Shove the entire moss ball completely underwater. You’ll see bubbles rushing out as the air escapes. Leave it pinned underwater for a solid 10 to 15 minutes. Ensure it soaks it all up.
- The Drain: Do not skip this. Pull it out and let it sit on a wire cooling rack for a mandatory 30 minutes. If you hang it back up immediately, it will drip muddy water onto your expensive rug.
- The Feed: Once a month during the active summer growing season, spike your soaking water with a half-dose of liquid foliage fertilizer. The peat strictly needs the nutrients reloaded.
Troubleshooting the Chaos
Things will go wrong. This is nature. Here’s how you fix them before the plant ultimately dies.
Fungus Gnats: You just built a damp, humid ball of peat moss. Fungus gnats are going to find it. If you see tiny black flies darting around your head, let the ball dry out a bit more between waterings. Lightly spray the outside with organic neem oil. Or, my personal favorite trick, dissolve “Mosquito Bits®” (BTI bacteria) right into your soaking water. It shreds the larvae instantly without hurting the plant.
Surface Mold: Fuzzy white mold appearing on the twine? Your apartment has terrible air circulation. Give it more indirect light, open a window or run an oscillating fan, and dab the mold with diluted hydrogen peroxide. It wipes out instantly.
Re-Mossing (The Upgrade): Eventually, super aggressive trailing plants like Pothos are going to vastly outgrow their home. You’ll literally see thick white roots stabbing right through the moss into the open air, desperate for space. Don’t throw it out. Just mix a massive fresh batch of mud, pack a thick one-inch layer directly over the old ball, wrap an entirely fresh layer of moss over that, and tie it up again with new twine. You just organically up-sized your pot without buying a single ounce of plastic.
The Bottom Line
Look, suspending a hanging string garden in your window is arguably the coolest way to greenify a cramped city apartment. It turns a boring corner into a piece of wild, floating architecture. But it takes actual work. You have to respect the substrate chemistry, ignore the succulent trend entirely, and stubbornly commit to the submersion watering protocol. Do the work, and you elevate a weekend craft project into resilient, living botanical art.
Cut corners, and you’ll just have a moldy ball of dirt destroying your floor.
Give it a whirl. And if you’re looking to get even more unhinged with extreme vertical space-saving, check out our guide on vertical aeroponics and wind engineering. Good luck out there.